The transition from a brilliant digital concept on a screen to a physical, high-quality custom paper box requires flawless execution.
Before a flat sheet of paperboard becomes a tangible product, brand owners and designers must first answer a foundational question: what is a dieline in packaging?
In short, it is the critical structural blueprint for any custom box.
While the concept may seem straightforward, mistakes at this foundational stage are incredibly common.
Errors can lead to wasted materials, delayed production timelines, and costly reprints.
This guide will help you navigate these pitfalls successfully and ensure your next paper packaging project goes off without a hitch.
The Basics: Defining the Blueprint
To properly answer what is a dieline in packaging, one must view it as the flattened, two-dimensional architectural layout that dictates exactly how a three-dimensional box will be cut, folded, and glued.
To easily visualize this concept, imagine taking an ordinary cereal box or a standard shipping carton from your home and carefully pulling apart its glued seams.
If you were to lay that unfastened cardboard completely flat on a table, the resulting shape—with all of its interlocking flaps, geometric panels, and tabs—is the physical representation of a dieline.
Before any paper is manufactured or any ink is printed, this two-dimensional map must be drafted in a computer-aided design program. It serves as an exact set of instructions for the manufacturing machines, breaking down the construction of the box into three fundamental actions:
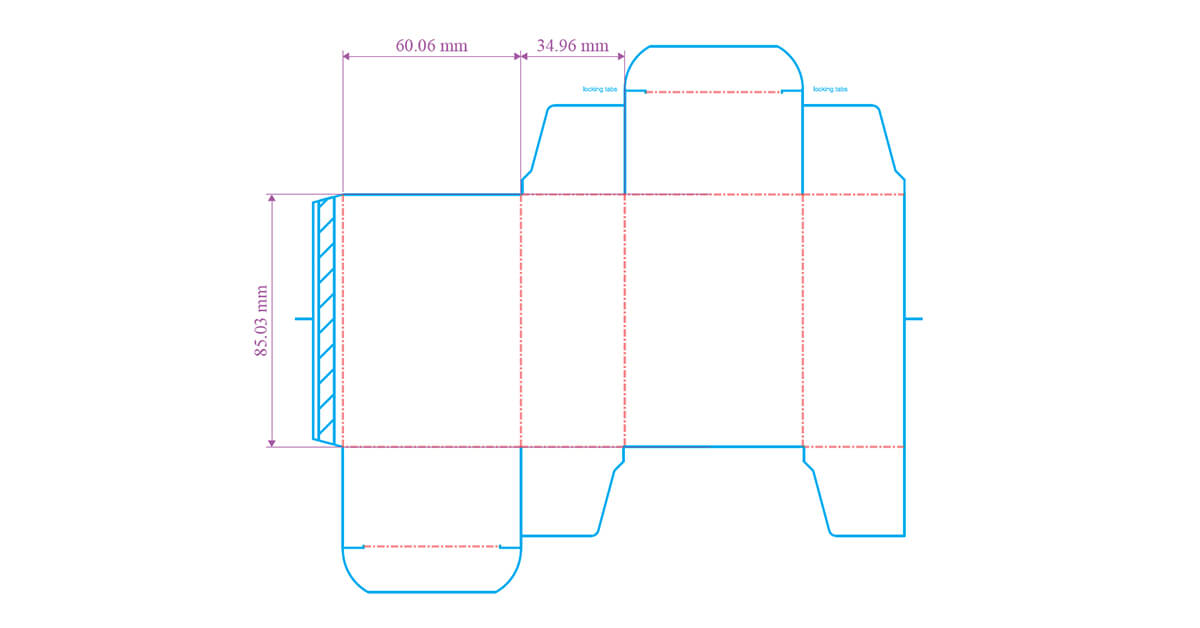
The Cuts: The layout maps out the exact outer perimeter of the flattened box, telling the steel blades where to slice through the paperboard.
It also dictates any internal cuts that need to be made, such as a transparent display window or a precise thumb notch.
The Folds: Inside that outer perimeter, the layout indicates exactly where the paper needs to be scored or creased.
These precise folding lines are what allow a rigid sheet of paper to bend at crisp, 90-degree angles to form a three-dimensional structure.
The Glue: A box cannot hold its shape without secure joints.
The layout designates specific, hidden panels—known as glue tabs—where adhesive will be applied to lock the folded paper together.
By meticulously mapping out every cut, crease, and glued joint, the dieline acts as the ultimate master plan. It ensures that when the flat paper is eventually run through high-speed folding machinery, it transforms seamlessly into the exact structural box you envisioned.
5 Common Design Mistakes to Avoid
A flawless layout is the key to cost-effective and accurate production. Here are five frequent errors to watch out for:
1. Failing to Account for Material Thickness
A fundamental misunderstanding of what is a dieline in packaging is assuming a single template is universal across all materials.
A structural layout must be mathematically adjusted based on the chosen paper substrate.
For instance, the structural tolerances for a thin folding carton are drastically different from those required for thicker corrugated boxes.
If fold allowances are not widened to accommodate the inner fluting of corrugated material, the assembled box will bulge, warp, or fail to close squarely.
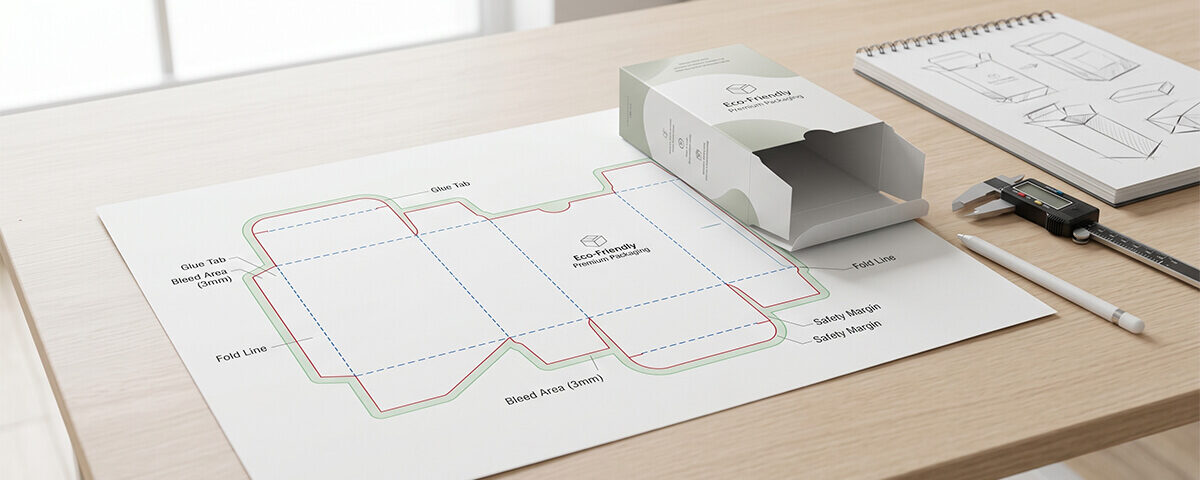
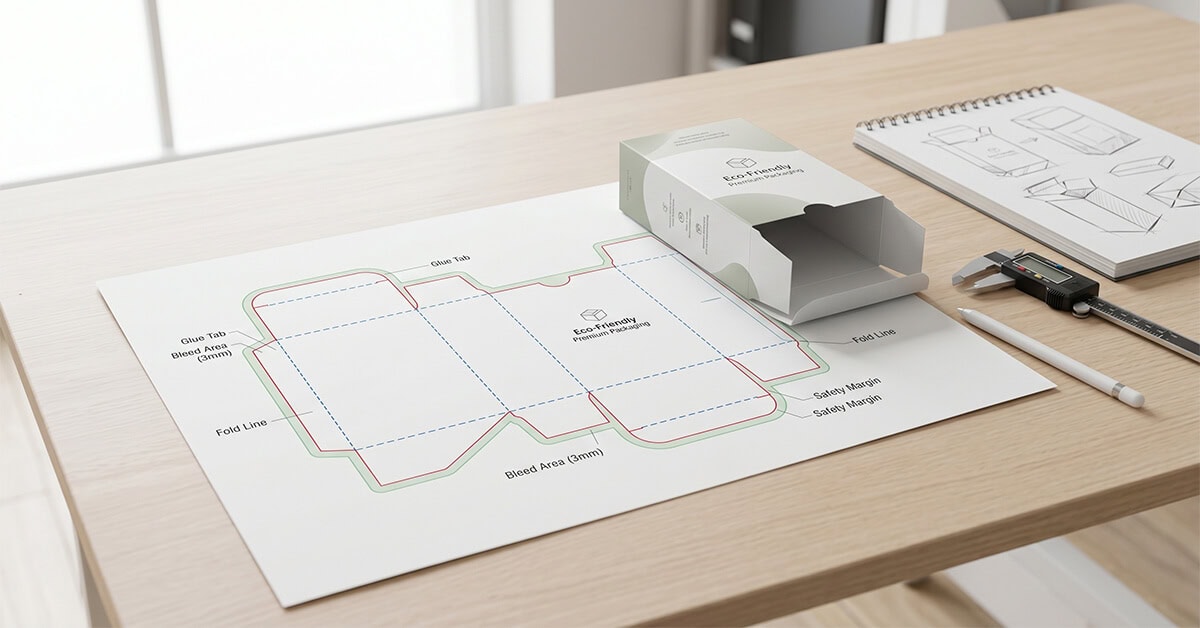
2. Inadequate Bleed Areas and Safety Margins
Anyone investigating what is a dieline in packaging must also learn the critical roles of bleeds and safety margins.
“Bleed” refers to artwork or background colors that extend past the designated cut line, while the “safety margin” is an inner boundary that keeps essential text away from the edge.
High-speed printing presses naturally shift a millimeter or two during mass production.
Without proper bleeds, these slight shifts will leave unappealing, glaring white edges on the final paper packaging.
3. Flattening the Dieline into the Artwork Layer
Properly managing what is a dieline in packaging requires strict layer control within vector design software like Adobe Illustrator.
The structural lines must remain on a distinct, non-printing layer, often formulated as a custom “Spot Color” so the printer’s RIP software can separate it.
If the structural lines are flattened, rasterized, or merged with the graphic artwork, the printing press will accidentally print those layout lines directly onto the finished boxes in ink.
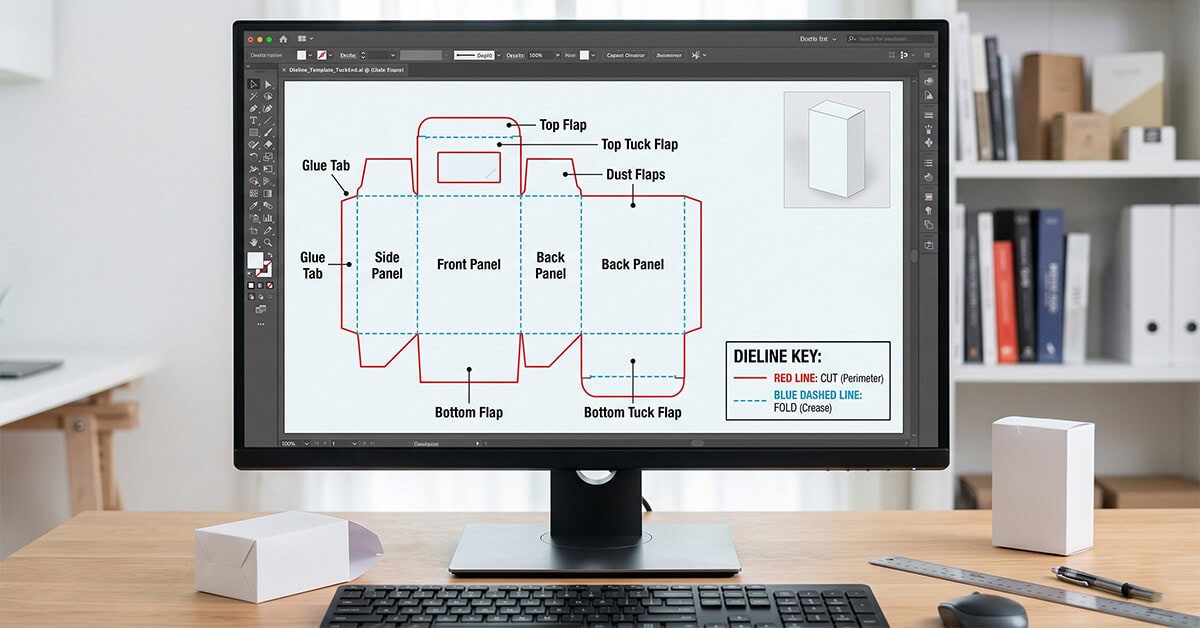
4. Using Incorrect Line Types or Color Codes
The visual language of what is a dieline in packaging relies on specific, universally recognized line types.
Generally, solid lines denote physical cuts, while dashed or dotted lines indicate creases and folds.
If a designer uses arbitrary line styles without a clear legend, the printing facility might accidentally slice completely through what was meant to be a folded edge, entirely destroying the structural integrity of the packaging.
5. Overlooking Functional Assembly Elements
Ultimately, grasping what is a dieline in packaging means recognizing how the end-user and the assembly line interact with the physical product.
Attention must be paid to the mechanical parts of the box.
For example, if you are designing a pre-assembled dispenser box, the layout must accurately map out functional features like a precise thumb notch for easy opening.
Furthermore, designers must ensure that no ink or varnish is applied over the glue flaps, as coatings prevent adhesives from sticking, resulting in a box that falls apart during fulfillment.
Mastering what is a dieline in packaging is the most critical first step toward executing flawless custom paper printing.
By understanding material thickness, honoring safety margins, maintaining clean design files, using proper line indicators, and mapping out functional elements, you protect your investment and elevate your brand presentation.
Always request a structural prototype or a blank, unprinted sample from your packaging partner to physically test the folds and functionality before committing to a mass printing run.
Taking the time to perfect the blueprint ensures your packaging performs beautifully from the factory floor to the customer’s hands.
