Having trouble with your artwork and design when dealing with your paper packaging vendor? Wasting too much time on back-and-forth discussion and communication with your factory during the designing and production process of your boxes?
This guideline is proper for you.
We’ve prepared and tested this guideline to speed up your whole box production process and minimize any printing errors or delays for your packaging order.
Follow the general rules below so that your designed artwork is fully prepared and ready to go.
In short, save your time, and make customization more accessible and fast.
#1 File Format
AI, PDF and EPS are the most accepted and preferred files format.
1 Adobe Illustrator File:
Adobe Illustrator file (.AI) is the best file format for printing since we have complete control of your artwork without flattening any of your designed artwork.
2 PDF File:
PDF file (.PDF) allows all your vector artwork to stay as editable vendors. However, some artwork can be flattened.
How to:
(How to save PDF files in Adobe Illustrator for printing?)
– File > Save As
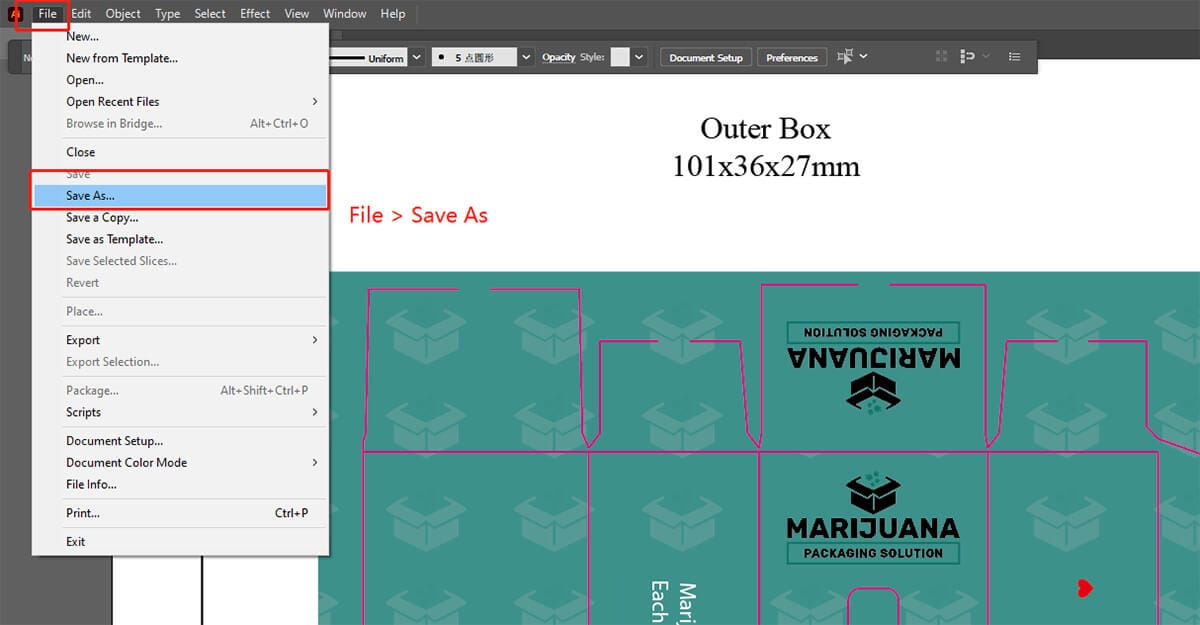
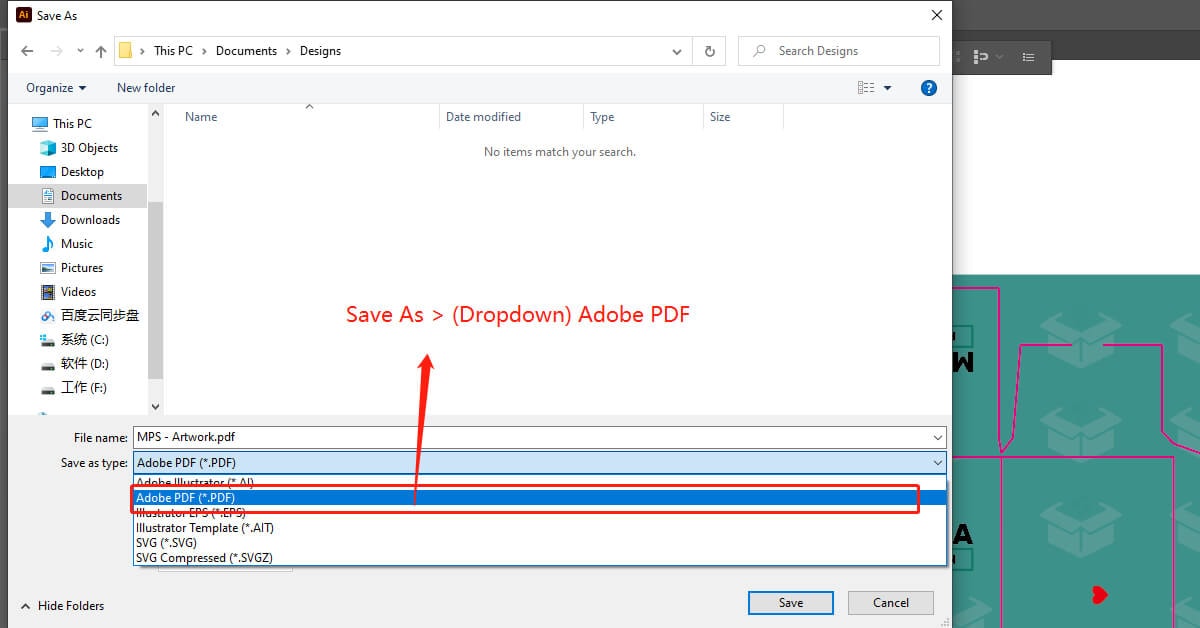
– On the format dropdown in the save window, Select “Adobe PDF (*.PDF)” and “Save”
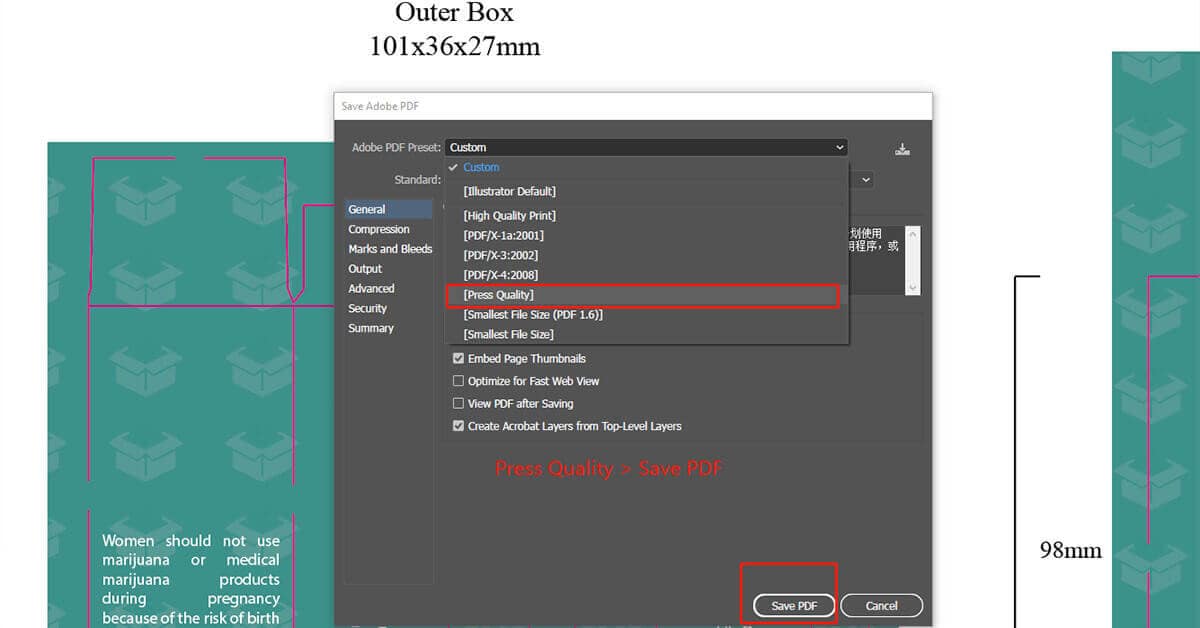
– On the preset dropdown, select “Press Quality” and click “Save PDF”
3 EPS File:
EPS file allows vectored designed files to be edited in Adobe Illustrator and other editing software.
#2 Color Profiles
– Use CMYK color space instead of RGB. If you are using an RGB color system, please change them into CMYK.
– We provide PMS printing, too. So you can use the Pantone color system in your design.
How to:
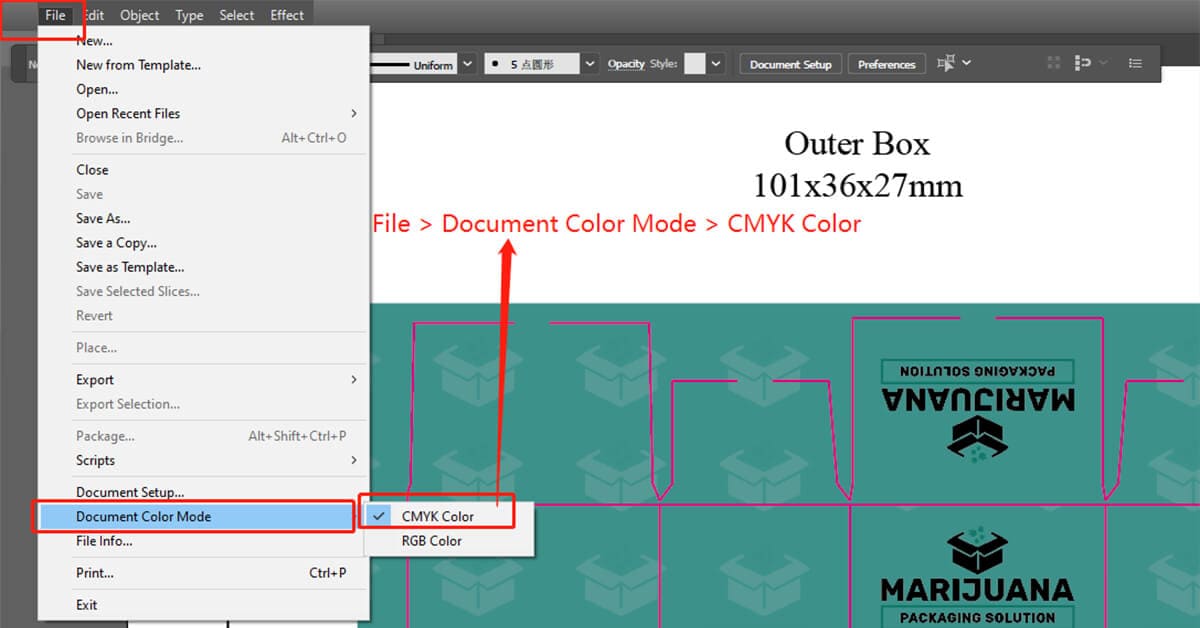
(How to change the CMYK color mode? )
– File > Document Color Mode > CMYK Color
#3 Outline Texts
It would be best if you converted all your texts into curves. (outline them properly) to make sure the printing texts will be the same as you designed.
Some customers would keep the texts not outlined and send us the fonts files they use in the design. It works in most cases but does not work on all occasions.
For instance, some chargeable fonts will not work on a new computer. And it will result in printing errors during production.
Therefore, the best and easiest way is to outline all your texts before sending files to your packaging vendor.
How to:
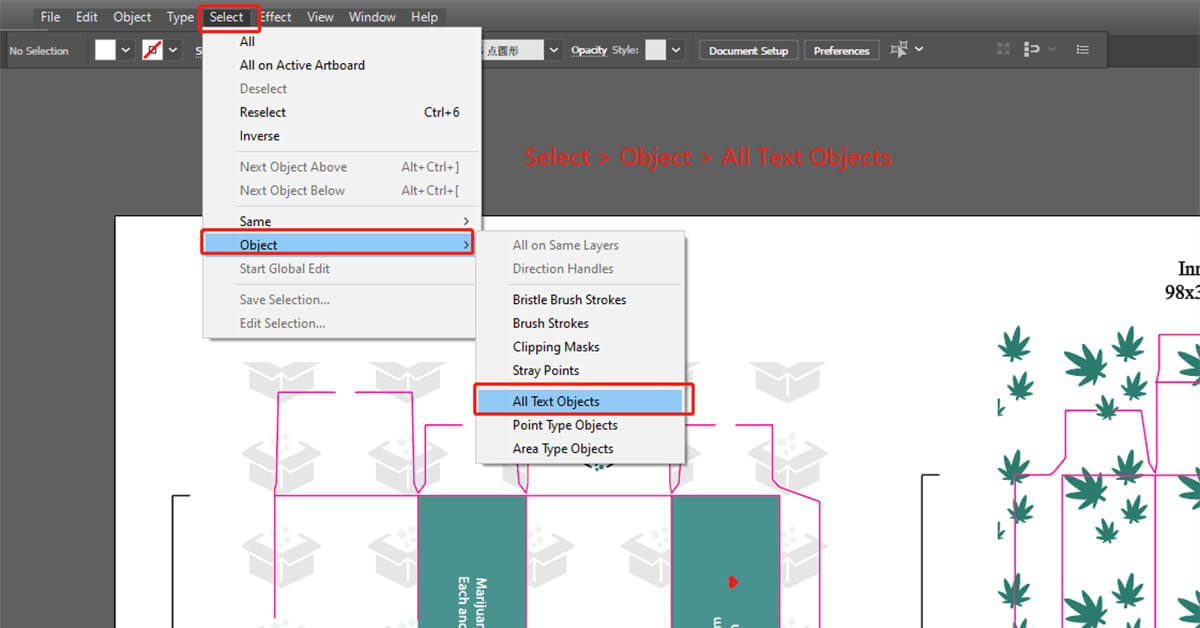
– Make sure all your artwork layers are unlocked. And go to the “Select” menu.
– Under the “Select” menu, go to “Object > All Text Objects” to select all texts objects.
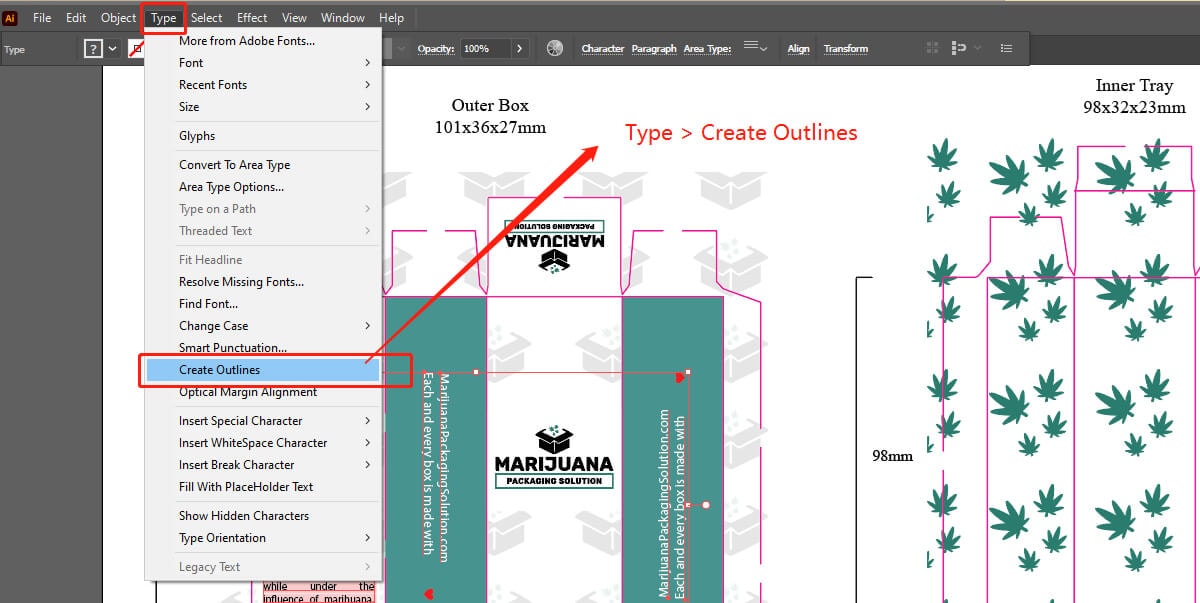
– To outline the selected texts, go to the “Type” menu.
– Under the “Type” menu, go to “Create Outlines” to convert all texts into curves.
#4 Rich Blacks
Make sure all the black elements in your designs be 100% K value.
(Values are: C 0% M 0% Y 0% K 100% )
How to:
– Select all black texts.
– Change all black texts to 100% K value by double-clicking the “Fill Color”
– Ensure that the following values are as follow: C 0% M 0% Y 0% K 100%
#5 Our Template And Dielines
1 Make sure to put your designs onto the template we made for you. Do not flatten the provided die line template.
2 Please do not change the dimension or indicating lines of our template to avoid any problems with your orders. Our templates are designed especially for our production systems. So if you need any size adjustments, please advise our salesman, and we will adjust templates for you.
3 Please do not edit or place your artwork in our die-cut layer. Please place your designed artwork in a new layer.
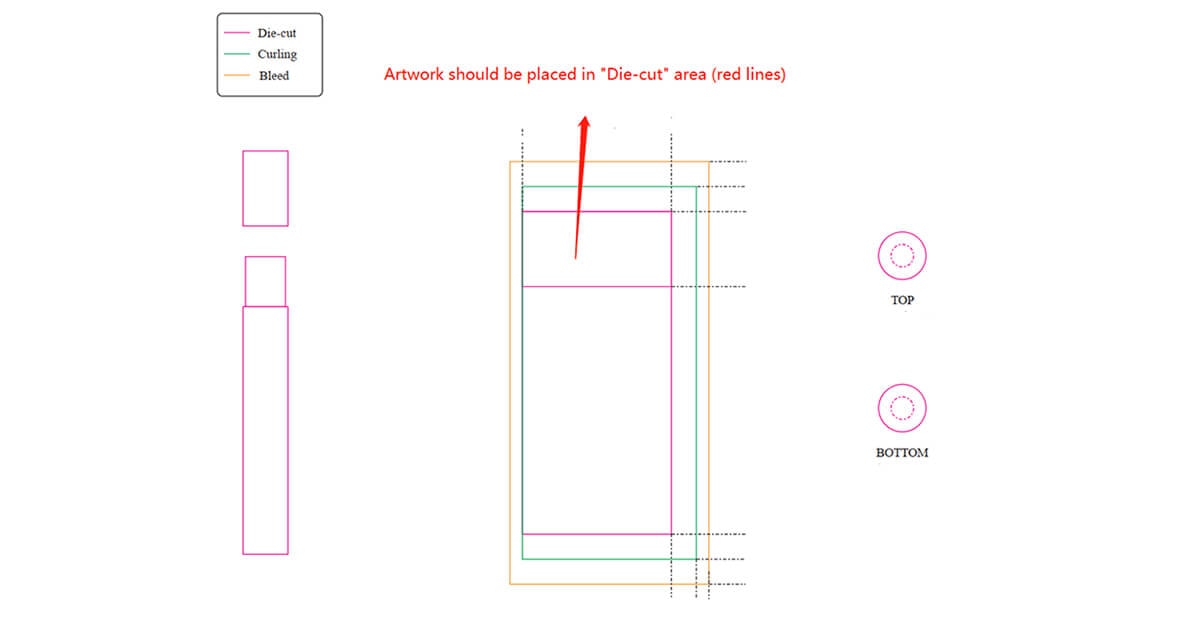
Here we will show you the indication of our template:
1 Die-cut (Red Lines)
The area where you can put your designed artwork on.
It indicates the cut at its final size. Important artwork should be placed at least 0.125” (4mm) inside of the die-cut.
Note: 0.125 inches (around 4mm) inside of the die-cut is supposed to be a safety margin area.
We didn’t include it in our template to not making the template too complicated for customers. (especially for those not designers.)
2 Curling (Green Lines)
Indicates where the product is to be folded.
3 Bleed (Yellow Line)
Indicates where the bleed line is located. Any artwork which goes to the die-cut (red line) should be extended to the bleed line to get a seamless point.
For instance, if you are using a colored background of your packaging, please be sure to extend that background to the bleed line so when the box is folded and assembled, you could see the background on some edges.
#6 Images And Patterns
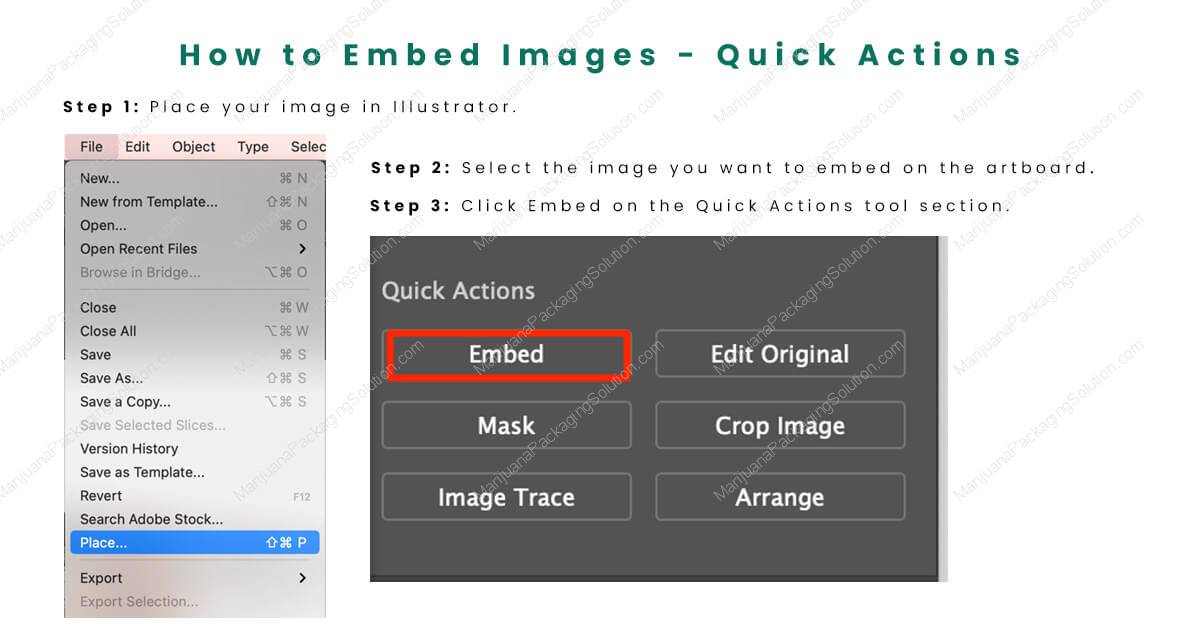
Please make sure all the images and patterns are appropriately embedded.
You can embed your images quickly from Quick Actions under the Properties panel.
- Step 1: Place your image in Illustrator.
- Step 2: Select the image you want to embed on the artboard
- Step 3: Click Embed on the Quick Actions tool section.
For more detailed information, we found a nice article that can be super helpful for you:
https://illustratorhow.com/how-to-embed-images/
#7 Extra Surface Finishing
If you plan to add additional surface treatment (surface finishing) to your packaging, such as gold foiling, Spot UV (gloss), Emboss, etc. Please be prepare files for additional printing options:
– Please indicate and adequately place the parts (that need additional printing options) in separate layers
– You need to place them on their dedicated artboard for clarity.
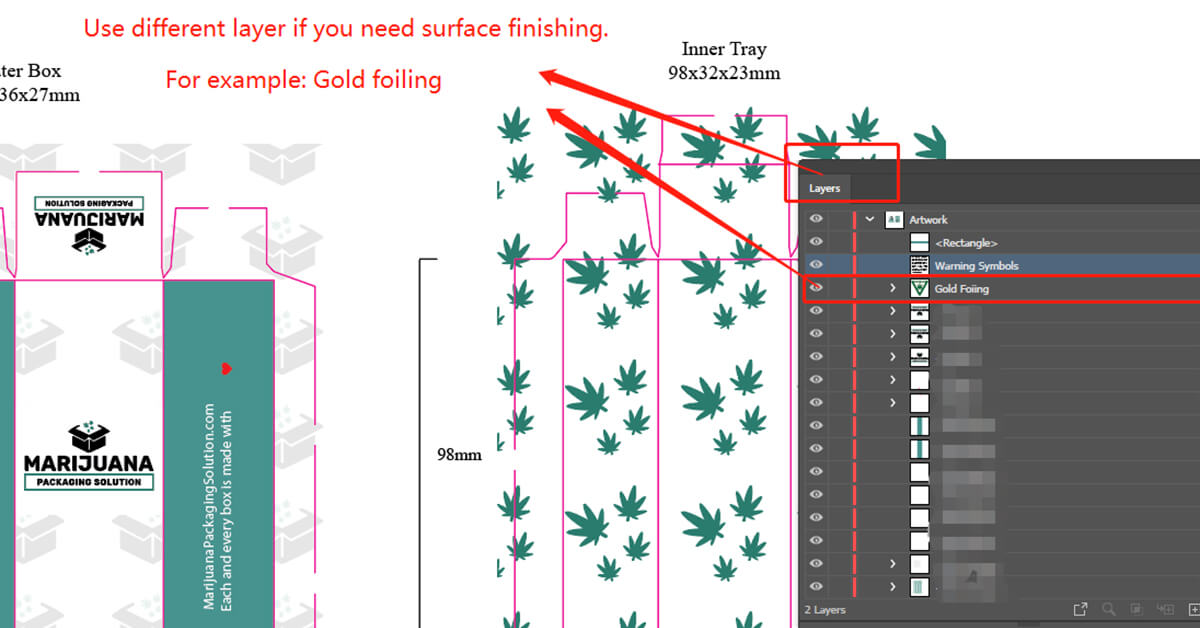
If you are not familiar with that and need our assistance, please.
Ensure all the elements (that need additional printing options) are vectorized, so we can separate them into a new layer.
– Indicates the parts you need surface finishing, or advise our salesman.
#8 Outside Print & Inside Print
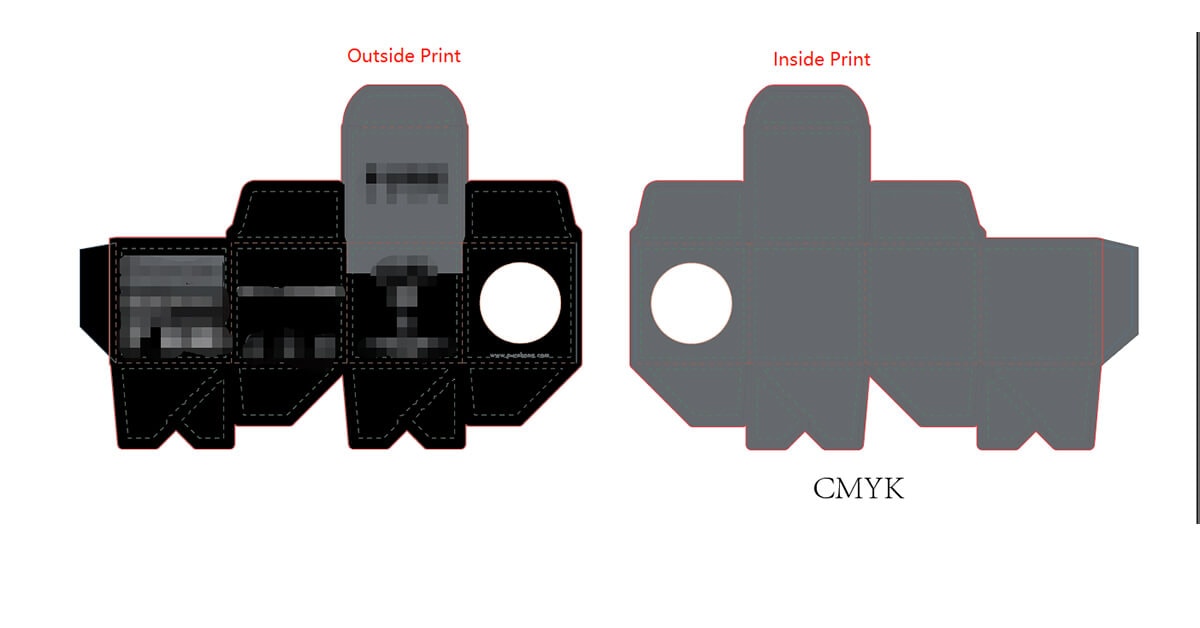
If you need your box printed on both the outside and interior surfaces, please indicate “inside Print” and “Outside Print” on separate artboards.
Also, remember to place the inside and outside artwork on different layers.
If you need assistance, please let us know, and we will make a separate section in our die line (Template), so you can quickly put different artwork on the related section.
